The fun begins. I have a Cisco switch that supports LACP (Link Aggregation Control Protocol) and I wanted to try and squeeze every little bit of performance out of my configuration. There is so much more than you can do with Linux Bonds for me and this blog post it will focus on LACP.
LACP
LACP (Link Aggregation Control Protocol) is a standard that enables devices to create a Link Aggregation Group (LAG). That’s the fancy name, basically it combines two network interfaces in to one. What benefits does it have and why are we going to all this hassle?
- Bandwidth
- Redundancy
- Improved Load Balancing
m.2 Expansion Card
I bought the following m.2 expansion card from amazon – https://amzn.to/4mofhci. It’s a 2.5gbpe card based on the realtek RTL8111H chip.
Dell Micro 7010
Proxmox is hosted on a Dell micro 7010. To install the expansion card I removed the wifi card that was installed in the m.2 slot. There is a micro knockout port that can be used to host the extra ethernet port.
I won’t give many details bar the above on the installation. It is fairly straightforward – just make sure you’ve powered off the hardware :).
Proxmox
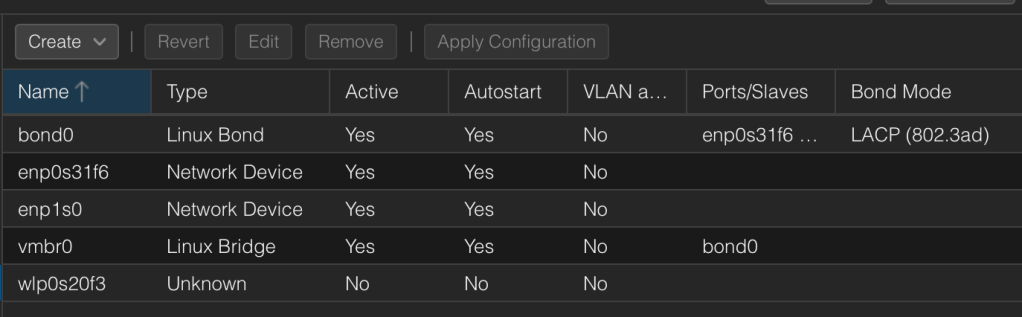
Within Proxmox ensure that your new m.2 expansion card is installed and recognised. You can find this by browsing to your host –> System –> Network.
For me I have the following installed:
- enp0s31f6 – My extension card
- enp1s0 – Onboard card
Before you begin configuring Proxmox its important to note that changes are made until you click ‘Apply Configuration’
Open your proxmox host - https://myipaddress:8006/, select your Host and then browse to System -->  Network.

Select vmbr0 and remove your NIC from bridge ports, in your case I remove enp1s0

From the menu select create --> Linux Bond. Within Slaves enter both of your NIC details - my example was enp0s31f6 enp1s0. Note there is a space between them. I selected LACP (802.3ad) within the Mode dropdown. To finish click create.
Some people select layer 2+3 from the hash policy but it's not required in my configuration.

Now we need to save the bond to the linux bridge. Select your linux bridge (vmbr0). Within bridge ports add your newly created bond mine was saved as bond0. Click Ok.

To finish off your configuration click Apply Configuration. Voila, you're done.
Leave a comment