
I thought that setting up and configuring a reverse proxy would be difficult as I have a fairly complex homelab and network, in actuality it was fairly straightforward. Here some notes that I had to collate. My current setup is a mixture of Proxmox, Opnsense, and with some Cloudflare usage mixed in.
In order to really utilise these steps it’s best to purchase a domain. I bought an .xyz which has a fairly low cost.
Adguard Home
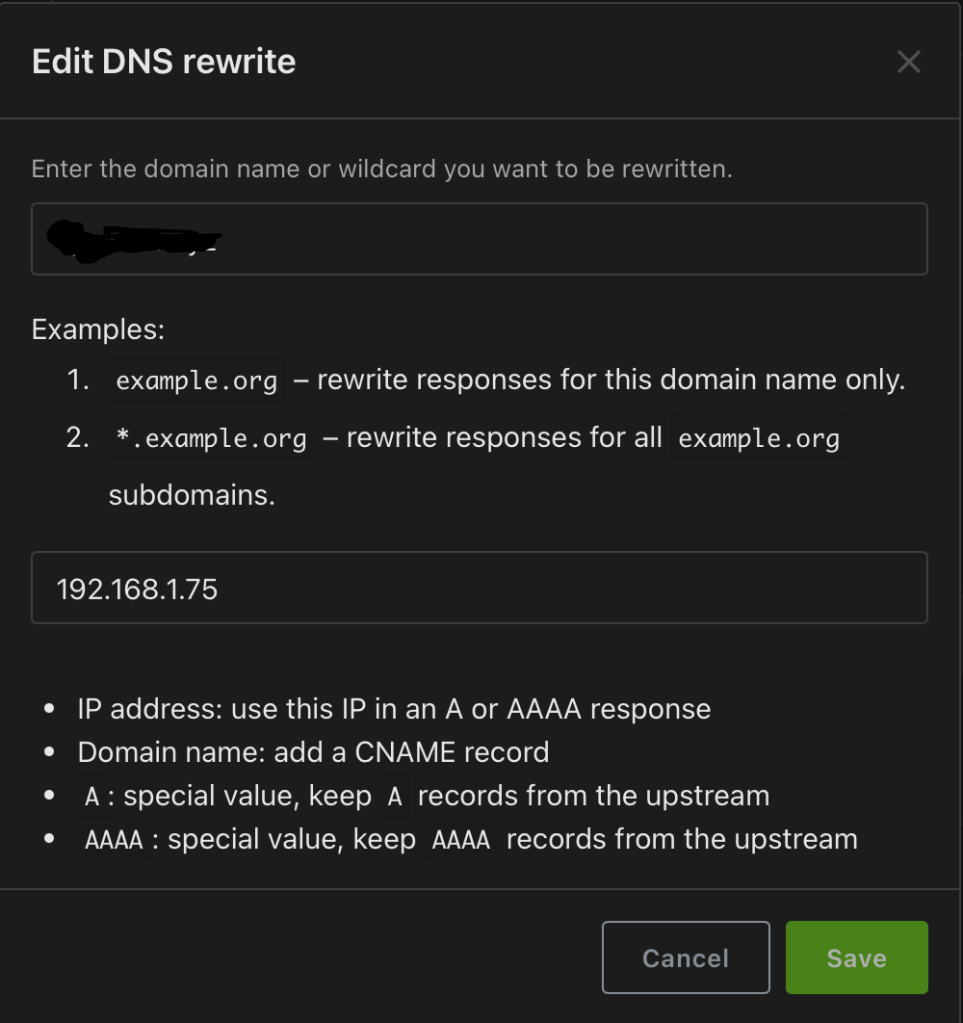
Within Adguard Home we need to set a DNS rewrite.
- From the homepage, select ‘Filters’ and then ‘DNS rewrites’.
- Click on ‘Add DNS rewrite’
- Enter your domain, in this example I’m going to use a wildcard so it will be ‘*.example.xyz’.
- For the IP address I added the lxc container of my nginx proxy manager so ‘192.168.1.75’.

Cloudflare
Cloudflare offer a free tier which should be more than enough for your homelab requirements. Depending on where you have bought your domain from you may need to configure some nameservers first of all.
- From your domain overview scroll down and on the right hand side you will see an API heading. A link will be available called ‘ Get your API token’. Click on it.
- User API Tokens will be the page you are navigated to. Click the ‘Create Token’ button.
- Click on ‘Use Template’ next to ‘Edit zone DNS’.
- Under the permissions heading select ‘Zone’, ‘Zone’ and ‘Read’
- Under Zone Resources set to ‘Include’, ‘Specific zone’, domain.xyz (whatever your domain is!)
- Click ‘Continue to summary’ and ‘Create Token’
- Save your API key as it will not be shown again. This is required for Nginx to provision the certificates.
Nginx Proxy Installation – Proxmox
Proxmox Helper Scripts
The Proxmox community scripts are a great resource and save a lot of time. They can be found here – Proxmox Helper Scripts
- From Proxmox select your node.
- Browse to ‘shell’
- Copy the installation script from the Proxmox community scripts link above. The specific installation script is quoted below.
bash -c “$(curl -fsSL https://raw.githubusercontent.com/community-scripts/ProxmoxVE/main/ct/nginxproxymanager.sh)”
- I followed the default installation steps within the script.
- Voila – its installed and will appear as a lxc container.
- To access your newly installed Nginx Proxy Manager browse to the IP address of your container ensuring you include the port number.
- Mine for example was http://192.168.1.75:81/nginx/proxy
- The default username and password is:
- username: admin@example.com
- password: changeme
New Proxy Hosts
I’m going to use my Komga instance as my main example below.
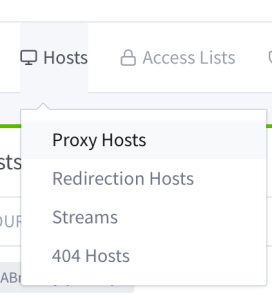
- From the Nginx main page select ‘Proxy Hosts’ and ‘Add Proxy Host’ using the button at the top right.
- Enter the following details for your service.
- Domain names: komga.example.xyz
- Scheme: http
- Forward Hostname / IP: 192.168.1.100
- Forward Port: 25600
- Block Common Exploits: Enabled
- Websockets Support: Enabled

- Select ‘SSL’ from the top heading
- Under ‘SSL Certificate’ select ‘Request a new SSL certificate’ from the dropdown
- Toggle ‘Use a DNS Challenge’
- ‘DNS Provider’ in my scenario it’s ‘Cloudflare’
- Credentials File Content
- You will see the following: dns_cloudflare_api_token=123456. Replace these numbers with the API token details you created earlier.
- Enter your email address to be notified of when your certificate will expire.
- Toggle to agree to the Let’s encrypt terms and conditions.
- This will create a SSL certificate for you to re-use for your hosts.
- Now to apply the SSL certificate to your host
- Select your certificate from the dropdown.
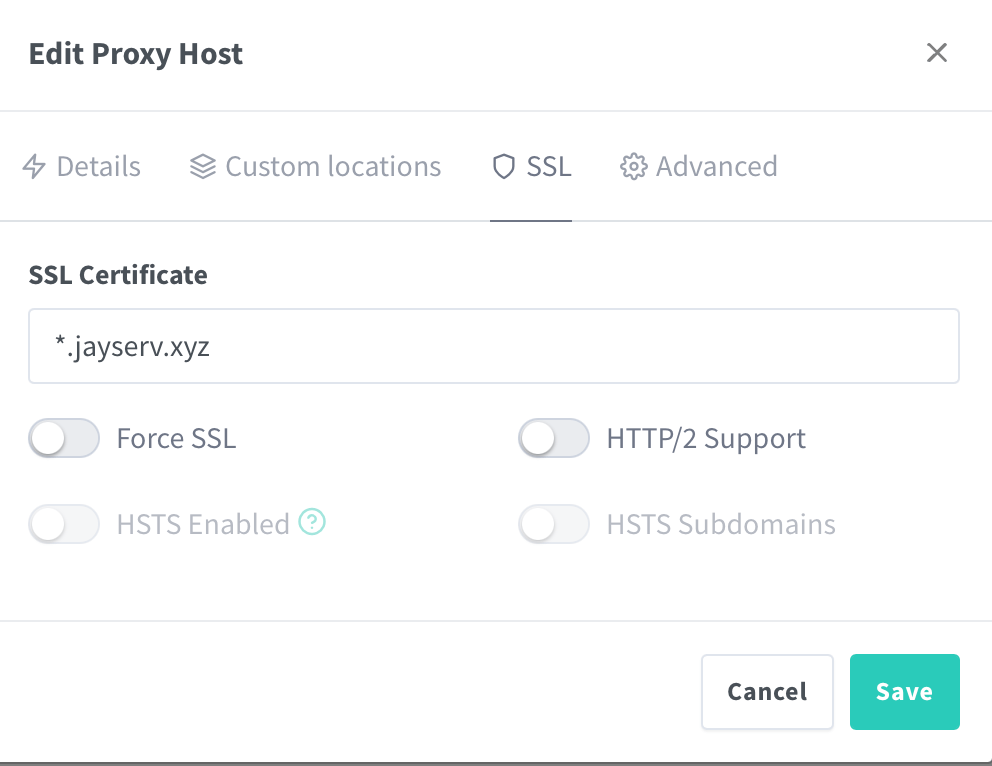
- When select save the status should change to “Online”.
If you want to create anymore follow the Proxy hosts setup and you can re-use the same certificate which will save a lot of time.

Leave a comment